
Custom event checklist for GA4
Keep GA4 tracking small and consistent: lowercase snake_case names, 3–5 params, DebugView QA, UTM standards, and watch first 24–72 hours.

If I want GA4 data I can trust, I keep the setup small, clean, and checked from day one. For a Shopify app, that means I map each custom event to one funnel step, use one naming format, send only a few parameters per event, and watch the first 24 to 72 hours after install because that’s where early uninstall risk often shows up.
Here’s the short version:
- I track the full path: listing visit, install, activation, upgrade, and churn
- I use lowercase snake_case event names like
app_install - I keep most events to 3 to 5 parameters
- I register only the dimensions and metrics I plan to use in reports
- I test in GA4 DebugView before release
- I compare live counts against Shopify Partners after launch
- I standardize UTM tags so source data stays clean
- I review 7-day and 30-day trends to spot drift
A few details matter more than the rest. GA4 is case-sensitive, so messy names split reports. Duplicate firing can inflate installs and trials fast. And if I skip source tagging or custom definition setup, I may collect data that I can’t use in GA4 reports.
In plain terms: this checklist is about keeping event tracking tight enough to answer four core questions - Where did installs come from? Which installs turn into paid users? What do new users do first? And when do they churn? If I can answer those, I can tie listing updates, traffic sources, and pricing behavior back to growth.
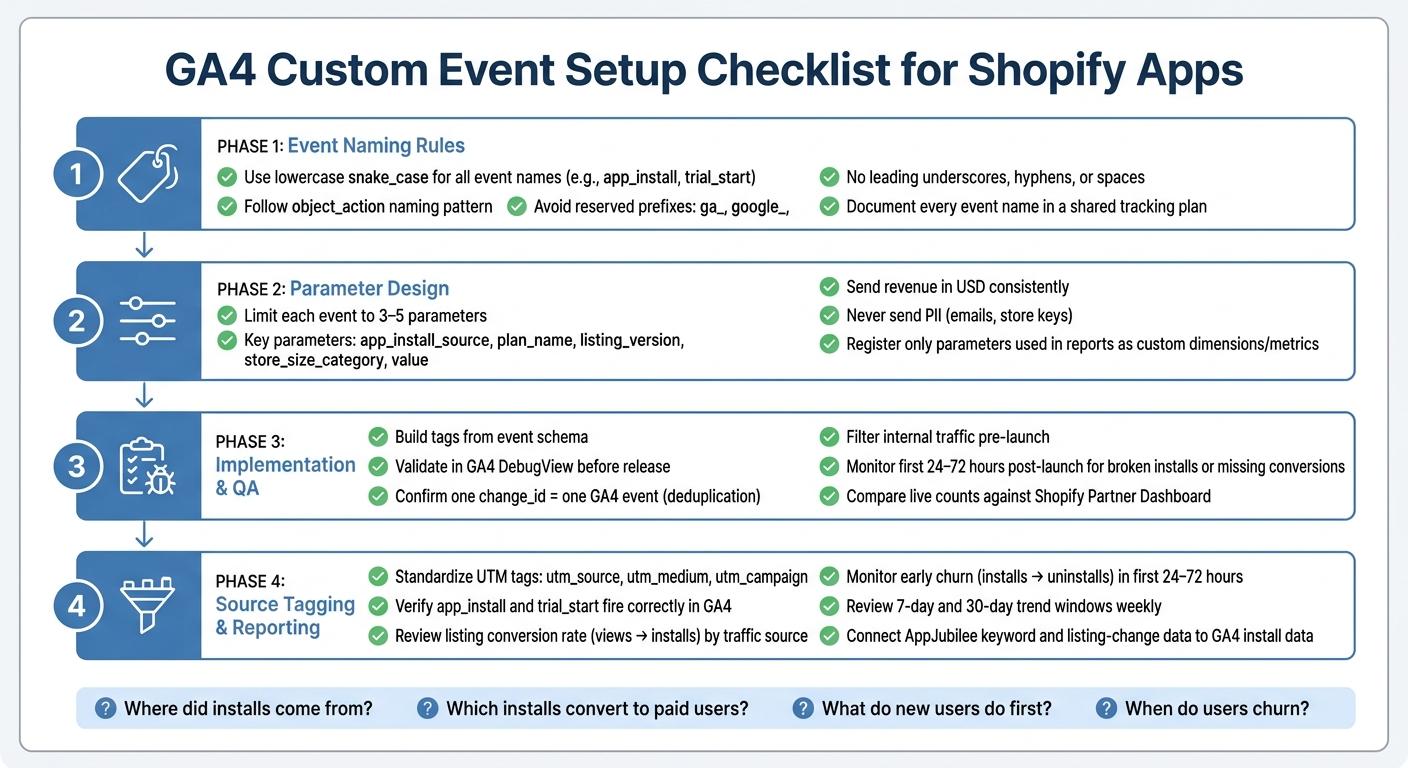
GA4 Custom Event Setup Checklist for Shopify Apps
GA4 Events: Parameters, Custom Events, Tracking, and More
sbb-itb-ce93587
1. Event naming rules for GA4
GA4 is case-sensitive. That means messy event names can split your reports and make clean analysis a pain. The fix is simple: use lowercase snake_case for every custom event.
Use one naming convention across all app events
Pick one naming pattern and stick with it across the app. A format like object_action keeps things neat and easy to scan in GA4.
Names such as app_install, trial_start, billing_accepted, and listing_view all fit that pattern and work well in reports.
It also helps to document every event name and its meaning in a shared tracking plan. That way, your team doesn't end up creating the same event twice under different names.
Avoid reserved names, prefixes, and duplicate event semantics
GA4 custom event names can't start with reserved prefixes like ga_, google_, or firebase_. They also shouldn't begin with an underscore. On top of that, skip hyphens and spaces.
Here's the short version:
| Rule | Do This | Not This | Why |
|---|---|---|---|
| Case style | app_install |
AppInstall |
GA4 is case-sensitive; snake_case is the standard |
| Reserved prefixes | listing_view |
ga_listing_view |
ga_ is reserved for internal Google use |
| Leading characters | billing_accepted |
_billing_accepted |
Leading underscores are reserved internally |
| Special characters | trial_start |
trial-start |
Hyphens and spaces are not supported |
| Taxonomy pattern | plan_upgraded |
Plan-Upgraded |
Breaks consistency and searchability |
| Semantic duplication | listing_view |
view_item |
Avoid duplicating GA4 event names unless the custom event has distinct business meaning |
Only create a custom event when default tracking doesn't cover the business action.
Next, define the minimum parameter set for each event.
2. Parameter design and custom definitions
Use each event to collect only the data tied to one growth question. That keeps tracking tight. The other piece of the puzzle is picking the right parameters.
Define the minimum parameter set for each event
Aim for 3 to 5 parameters per event. That’s usually enough context to make decisions without turning your schema into a mess.
For Shopify app tracking, this set handles most growth questions:
| Parameter | Data Type | Example Value | Why It Matters |
|---|---|---|---|
app_install_source |
String | "app_store_search" |
Tells you where installs originated |
plan_name |
String | "Pro" |
Segments behavior by pricing tier |
listing_version |
String | "v2_new_title" |
Links listing changes to performance shifts |
store_size_category |
String | "large" |
Identifies larger merchant segments |
value |
Number | 29.99 |
Tracks revenue; send billing amounts in a consistent currency, preferably USD |
Send revenue in one currency, preferably USD, and keep each parameter type consistent. If value is a number once, it should stay a number every time. Mixing types is where reporting starts to fall apart.
Also, do not send PII. Merchant emails, store-specific keys, and other personal identifiers should stay out of GA4.
These parameters only start pulling their weight after GA4 registers them. That’s the next move.
Register custom dimensions and metrics that reports actually need
Register only the parameters you plan to use in GA4. If a parameter isn’t registered, it won’t show up in reports or Explorations.
Start with plan_name, listing_version, app_install_source, and keyword as custom dimensions. Then set up value and installed_days as custom metrics. installed_days is especially useful for spotting early churn, since that drop-off often bunches up in the first 24 to 72 hours after install.
Use keyword and listing_change_id to tie search intent and listing edits back to installs and conversions. That link matters. Without it, you can see movement, but not what caused it.
Register only the parameters your reports will actively use. Think of registration as a choice, not something you do by default.
Next, take this parameter set, build your tags, and check everything in DebugView before release.
3. Implementation and QA checklist
Set up tags and document the tracking plan
Turn your event schema into tags, then test everything before launch. Keep the tracking plan simple and easy to check: one row per event, with the trigger, parameter names, data types, and dedupe key.
That way, QA can confirm the events tied to install quality, activation, and churn reporting without digging through guesswork.
Validate events in DebugView and staging before release
Once tags are live in staging, open GA4 DebugView and test each trigger by hand. Make sure the event name follows your naming convention, every required parameter shows up in the payload, and each value uses the right type.
Start with deduplication. One single change_id should lead to one GA4 event. If the same event fires more than once, install and conversion counts get inflated fast.
Before going live, filter out internal traffic too. Otherwise, test sessions can skew your baseline and muddy the data from day one.
When events fire cleanly in staging, move on to source tags and GA4 reporting checks.
Monitor live data after launch for drift and anomalies
The first 72 hours after launch need close attention. Check daily counts to spot broken installs, missing conversions, or source-tag mistakes, and compare those numbers against the Shopify analytics via the Partner Dashboard as your baseline.
| Check Category | Pre-Launch QA | Post-Launch Monitoring |
|---|---|---|
| Event accuracy | Validate names and parameter payloads in DebugView | Monitor for missing parameters and unexpected spikes or drops |
| Source attribution | Test UTM parameters in staging | Verify which sources drive live installs via the GA4 pixel |
| Funnel integrity | Check trigger timing for each onboarding step | Monitor early churn and listing conversion rate |
| Data stability | Confirm single-fire behavior for key events | Compare current data to 7-day and 30-day trends to filter noise |
After week 1, log every schema change with the date. That includes renamed parameters, type changes, and retired events. Use 7-day and 30-day trend windows to separate real drift from normal variation.
After the first-week stability check, verify source tags and reporting paths.
4. Source tagging and reporting checks
Once event QA is steady, make sure your traffic sources and reports line up with the growth signals you’re watching.
Standardize source tags for install and listing traffic
When your events are working in production, the next thing to fix is attribution. If UTM tagging is messy, GA4 can’t cleanly tell the difference between paid ads, partner links, and organic App Store search and browse traffic.
Use the same UTM parameters for all external traffic: utm_source, utm_medium, and utm_campaign. That includes partner links and paid ads. For outreach, skip links that muddy source attribution, and keep campaign tagging the same across channels.
Once your source tags are in place, check that those visits show up in the correct GA4 funnels.
Verify key events, reports, and funnels in GA4
Confirm that app_install and trial_start are firing in GA4. Then review listing conversion rate, from views to installs, and early churn, from installs to uninstalls, by traffic source.
This is where the reporting starts to tell a clearer story. If one source drives plenty of listing views but few installs, that’s a signal. If another source brings installs that uninstall fast, that’s a different problem.
Connect AppJubilee insights to GA4 event reporting
AppJubilee connects to GA4 through OAuth and maps keyword data and listing-change data to GA4 source categories. When you push a listing change, log the date in your tracking plan. Then compare AppJubilee’s Listing Change Impact view with GA4 install data for that same window.
If rankings moved and installs followed, you have evidence the change worked.
Conclusion: The core GA4 custom event checks to keep
Keep your event taxonomy small and stable before tagging starts. Pick one naming convention, check it in DebugView, and after launch, keep source tags aligned so installs, trials, and paid conversions land in the right funnels.
After launch, the work shifts from setup to monitoring. Review 7-day trends each week so you can spot drift early. Also keep a close eye on listing conversion rate and early churn in the first 24 to 72 hours after install.
Once the data stays stable, you can use it to tie traffic sources, keywords, and listing updates back to conversions. Pair GA4 with Shopify Partners and AppJubilee's keyword and listing-change insights to see which sources and updates are driving conversions. That gives you clean attribution and a dependable install-to-paid funnel.
FAQs
Which GA4 custom events should I track first?
Start with events that show merchant intent and listing performance:
- clicks on key CTAs like Add App or Learn More
- engagement signals like scroll depth and video interactions
- external traffic sources
These help you measure conversion, content effectiveness, and which keywords or campaigns bring in the most qualified visitors.
How do I prevent duplicate events in GA4?
Make sure your Shopify-triggered code sends each custom event once per user action.
The simplest way to do that is to give every event a consistent identity, like an event_id or an order/attribution ID. Then, if the same key shows up again, your code should treat it as a repeat and skip it.
You should also block duplicate sends caused by retries or page re-renders. A simple sent flag can help on the client side. On the server side, store the dedupe key before sending so the same event doesn’t go out twice if the request runs again.
Keep the parameter schema the same every time you send the event. That makes QA much easier, because they can check that each workflow step maps to one event, one key, one payload shape.
What should I do if GA4 and Shopify counts do not match?
This happens a lot because GA4 and Shopify track data in different ways. For final install counts, use Shopify as your source of truth. Then use GA4 to understand on-page engagement and how traffic moves through the listing.
To dig into the gap, first make sure the GA4 pixel is set up the right way on your listing. AppJubilee can then compare GA4 engagement data with Shopify Partners install and conversion metrics. That makes it easier to tell whether changes came from traffic patterns or listing updates, instead of a tracking mistake.